Saturday, April 11, 2009

Creating Papers 1 EZ Stripes and Patterns


Creating Papers Tutorials


Creating coordinating striped papers to go with your layouts

1. Choose The photo that you want to use.


I will be using this picture as an example. Aww arnt they cute hehehehe


2. Duplicate the photo and close the original.


3. Use the rectangle selection tool to select a portion of the image to get the colors you want to use.


My Selection


4.Choose Effects Image Effects Offset.


And use the following settings play with the horizontal offset settings till you get something you like


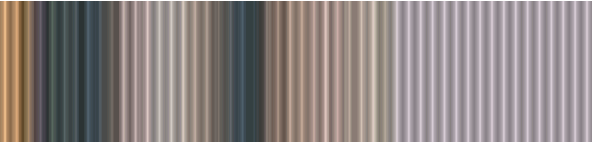
Here is what I ended up with


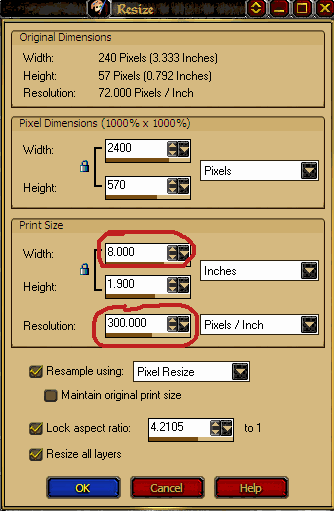
5.Ok time to resize and get proper dpi

Goto: Image / Resize


Set Width to the size of your paper if you don’t want the pattern to re-pete.

This is how mine is set.


If you want it to be a repeating pattern it would be set to less than the size of the paper.


Set The Resolution to 300 dpi


6. Now save Goto; File / Export / Jpg Optimizer and save


When you want to use simply open a new image and use this image as a fill and you have a great striped paper.

And this save massively on storage space.


Part 2 Endless papers to make from these simple stripes


Start with Opening one of your stripe Pattern Fills

I will be using the one I made in Part 1 Of this tutorial.


A. Simple way to get that Corrugated Paper look

1.Create a new Layer


2.Set To Gradient in the Materials Pallet On the foreground color


3. set the Background color to Black


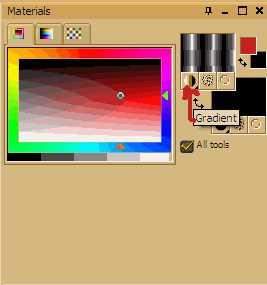
4. Fill new layer with the black Gradient

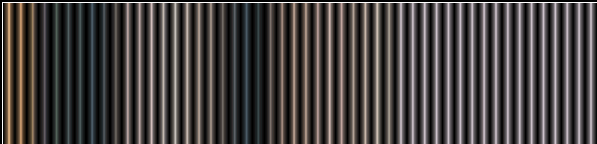
You will end up with something like this. It gives a metallic tube look to it


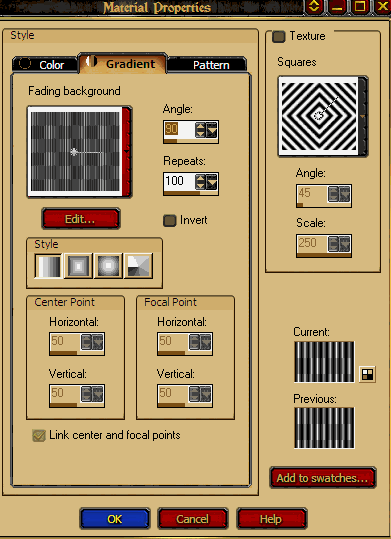
Settings I used for the fill play with these to get what you like.


5. Adjust the Opacity to your liking and there ya have it a corrugated looking paper fill


You can use this Technique over any finished paper to get this look.


B. Pattern Play

Again I will be using the Pattern Fill I made in Part 1 Of this tutorial.


Only one step here to make a million papers


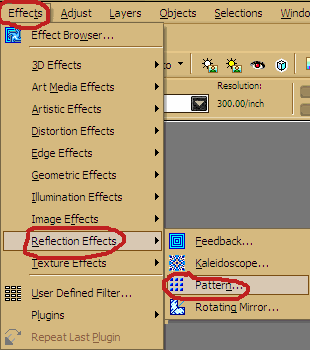
1 Goto : Effects / Reflection Effects / Pattern

Now just play with the settings and your done.


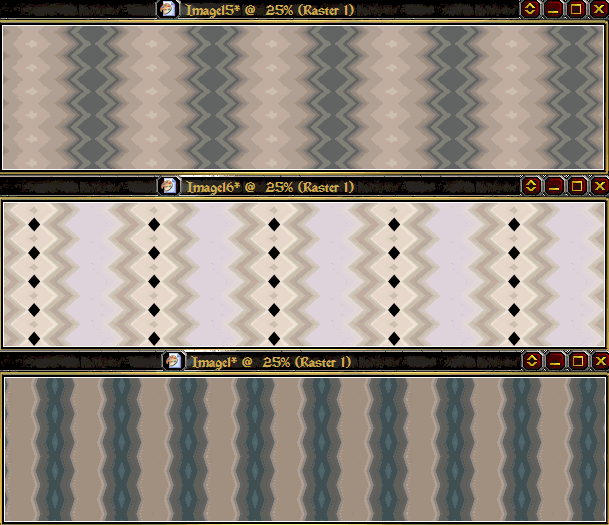
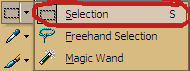
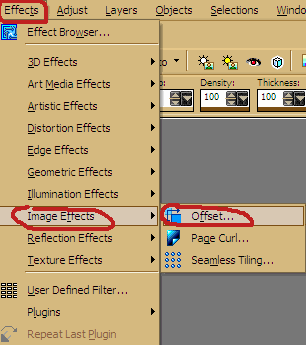
Here are a few Samples of how mine turned out.

I hope you have a ton of fun playing with this J


Thursday, January 15, 2009

Lets Make A Bottlecap


Bottlecap Tutorial
IBAScrappin1 AKA Cheryl
2 Cut down on the length of this tutorial I have supplied some templates.
Get Them Here
While doing this tutorial it is a good idea to save your settings in the different effects, so when you goto make another one they are already there for you
If you need some ideas for caps check out this site http://www.bottlecaporama.com/
For some reason i cant get the one section of the tut to line up right so I hope that you can still follow it .


1 Use your magic wand to mask the template image(keep masked till told to unmask)
2.Goto Effects/3d Effects /Inner Bevel use these settings


3. Goto Effects/Artistic Effects / Chrome and use these settings.


4.Goto Effects/ Geometric Effects/ Spherize and use these settings.


5.Goto Effects/3d Effects /Inner Bevel use these settings.
You can now unmask


Making The top of the cap
1 Create a new layer.
2. Using the paintbrush round shape, size 258 for tagger size cap, size 390 for scrap booking size
Paint your top color in the center of your cap base it should look something like this


3. Use your magic wand on what you just painted (keep masked till told to unmask)
4. Goto Effects > Artistic Effects > colored edges and use these settings: the color you choose should be a lighter shade of the color you are using.


5. Goto Effects > 3D effects > Inner bevel and use these settings: For the color in this 1 go a little darker. Just play with it till u get the result you want. U will see the fifference in the right side of the box


You should have something like this but in your color


6 Use the Raster Deform tool to size your cap top so that it is how u want it. Unmask when finished.
In this sample I have made it a little longer to cover the white spot on the top and bottom


7. Now just decorate your cap to your liking.


Note : if you want color the bottom part simply use the dropper and get the color off the top and use the change to target brush tool on the bottom of your cap Then goto adjust /brightness darkness to get the look you want. And change to target brush tool 1 more time . And it will look something like this.


And after playing with it for a bit this is what I ended up with


Hope you enjoyed this tut and that it was helpful. Would love to see your creations from it so drop me a comment so I can see where u have it posted

Sunday, January 11, 2009

Just Playing with PSP


Spent Alot of time playing with PSP today I think this came out great. Had to make it , Its my Fave This is starting to become a challenge hope I dont get hooked on making these :)

Valentines Bottlecap


I have always loved creating these bottlecaps. so I thought I would create 1 today to see if i still remembered how to do it. a little rusty at first but I think it turned out well :) Maybe I will start a collection .


Create Cinnamon Heart Candies using PSP

Lets Make Some Cinnamon Hearts Candy
Using PSP and Eye Candy
Written By IBAScrappin1 AKA Cheryl

This Tutorial is not to be duplicated or distributed to any group without my permission .Please contact me if you wish to use in your group.


1) Create a new image
for a full size kit 300 X 300 Transparent background and 300 dpi
for a scrapper size kit 200 X 200 Transparent background and 100 dpi


2) With your background color set to black, and your foreground color turned off . Use The Elipse Tool create an oval shape. You should end up with something like this


3) Once you have this shape goto layers and promote this image to a raster layer


4) Using the raster deform tool. Rotate your image to one side slightly to get something like this.


5) Copy this image… Paste it as a new layer.. And then mirror it.


6) Use the move tool to move one of the layers over the other one to get a heart shape with a rounded bottom. You should have something like this.


7) Goto layers / Merge/ Merge Visable. You will now have 1 layer.
At this point save your works as a
(Your Name)-candy heart template-(dpi size here).pspimage


Adding the detail to your template.


1) Create a new layer


2) Using the magic wand click inside of your heart image. It will now have those nice little marching ants running around it :)


3) Make sure you are on your new layer place this color #c72032 in your materials box

4) Use the fill tool at 82 Opacity and fill your masked area.

5) Use these settings in your Eye Candy’s Bevel Boss

Basic settings
Bevel Width = 33.39
Bevel Height Scale = 5
Smotthness = 100
Bevel Placement = Inside
Darken deep areas = 0
And shade interior checked

Lighting Settings
Direction = 154
Inclination = 65
Highlight Brightness = 100
Highlight size = 25
Highlight color = white
Shadow color = black
You will end up with something that looks like this when u turn off your bottom layer .
Red x threw eye means it is turned off as seen in image below


6) Create a new layer under your color filled layer it should still be masked.


7) Use the fill tool at 82 Opacity and fill your masked area with this color #e55963


8) This candy has some little specks in it to add these use your air brush on the following settings on this layer in white and black.
Step 32 Denisity 23 Opacity 53 Normal blend


9) Copy merged and paste as a new image . Goto Adjust / Brightness and contrast and use the following settings.


and you are done. Here is both sizes finished I Hope you enjoyed this Tut.
Play with it and see what other candies you can create :)
would love to see your creations so leave me a message so i can come check them out .
Happy Tagging, Scrapbooking and PSPing!!!!

Please Let me know if this was helpful to you.If I get enough responses I will write more tutorials :).


300 dpi


100 dpi

World Scrappers

Tunes


MusicPlaylistView Profile
Create a playlist at MixPod.com